JOB-SITE
|
 |
Getting Started with Asana
The following is the set-up procedure for a desktop computer running a MicroSoft operating system. Any other application will be similar, but not exactly the same. If you have access to a desktop, follow the steps below to learn about the features, and then download the apps for your pads and/or phones. The on-line instructions are very good, and once you understand the flow, loading the other apps will be much easier.

Go to the Asana website home page and follow the steps to open an account.
Register using business e-mail address.
Confirmation is sent to your business e-mail account. Complete the sign-up process there.
Create and confirm password.
Create account.
There are many ways to set up the account. You are encouraged to explore the many features of Asana after you learn to use the account. For now, set it up the way I suggest, as the information on this page will be based on the way I have set up the screen.
Useful terms
|
ASANA TERM Workspace Team Project Task Sub-Task Follower |
YOUR APPLICATION Your Company Job Phases Your Project Job Task Activity Employee, Sub, Client |
EXAMPLE ABC Construction, Inc Prospects, Pre-Contract, Construction, Warranty Jones Residence Rough Framing Install Floor Trusses Susan |
Add a Task
When you first come into the Asana window, you will view two panes. The left pane is the control page dashboard and the right pane is the activity field.
At the top left of the task pane is an Add Task button. Click on that to open a Task line and add a task. You can also just hit Return after typing a task, and the line below that will open for another task.
Add a Section
At some point, you will want to organize all the tasks you have added. Nothing could be simpler.
Go to the Add Task button in the upper left of the task window, click on the down arrow to open the menu, and select "Add Section". A section will be added or inserted at the next line down from where you cursor is currently placed.
You can now grab tasks that belong in the section you just created and move them to that section. Move your mouse to the line number corresponding to the task you wish to move, click to grab the line and move the task to a position under the section label. DONE.
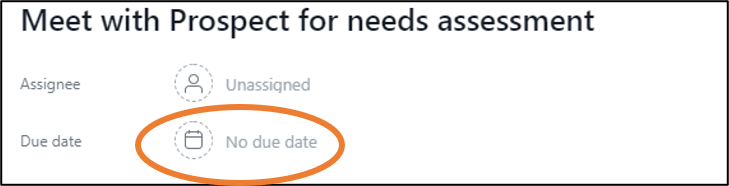
The Detail Screen
Click on "Details>" at the end of a task line to open the Details Window. Using the icons on the Detail screen, you can...
|
Assign the task |
 |
|
Set the due date for a task |
 |
|
Attach a document or file |
 |
|
Add sub-tasks |
 |
|
Add tags, Delete task, Duplicate task |
 |
|
Add a Comment |
 |
|
Add a Collaborator |
 |
Try these tasks
Click on the Due Date and set the date of this task for two days from now.
Click on the Sub-Task icon and add the sub-task "Learn to use the sub-task menu" now.
Click on the Tag icon and apply a special tag to the task. Type "Admin" as the tag name.
Click on the Attach File icon and note that you can add files from your computer or from Dropbox. More information about Dropbox can be found elsewhere on this website or at http://www.dropbox.com. You will use this feature to add plan files, pictures of framing, or even live Excel, PowerPoint, Project or many other useful applications.
Add a time-stamped comment by clicking in the Write a Comment box. Any follower of the task can also add comments to the task. Insert the comment in the box and then click on the blue button to save. Add a comment to this task now.
Collaborators are individual e-mail addresses that will be able to view and will receive updates on the task. You add them by inserting their e-mail address. They receive an invitation to join, and can do so or not. Add a follower to this task now.
Add a Project
Click on the company workspace you just created.
Under the name bar, click on the "+" next to Projects.
Add the name of a project on which you are currently working.
That's all there is to it. You can now start adding tasks, giving those tasks a timeframe, assigning the task to yourself or members of your team, and tracking the tasks to make sure they get completed.
Here's a way to speed up that process

Builder-Resources has built a template that documents 300+ steps in building a project, which you can add to your Asana account file.
The cost of this package is only $89.00, and it will save you hours of work and get you managing your jobs instead of setting up the application.
Go here to get more detail on this valuable service from Builder-Resources.
Practice Using the Application
Add Task 1 to the project.
- Assign that task to yourself.
Add Task 2 to the project.
- Assign that task to a co-worker.
Add Task 3 to the project.
- Add a tag to the task.
- Attach a file to that task.
- Add a follower to that task.
Delete Task 1.
Mark task 3 as completed.
Add a section called "Startup" to the project.
Click on the HELP tab at the bottom of the left pane and read about Asana's advanced features.
START USING THE ASANA APPLICATION TO
ORGANIZE YOUR BUSINESS, DELEGATE RESPONSIBILITIES, AND
MONITOR ACCOUNTABILITIES.
|
View the Asana Introduction page |
 |
View the Template Installation Page |
|
 |
How to Install and Set Up Asana |
The Builder-Resources Asana Template ----> |
 |
|
Return to ----> |
 |

The Answer for Project Control

 |
 |
 |
 |
 |
 |
 |
 |
|
 |
 |
 |
| Copyright © Builder-Resources. All rights reserved. Used by permission. |
Builder-Resources.com Builder-Academy.com Builder-BOS.com |
Design by: |